You open Task Manager on your new Mini PC, click over to the Performance tab, and spot a number under “Dedicated GPU Memory” that looks… small. Maybe 512MB. Maybe 2GB. And you think, is that really all the VRAM I have?
It’s a fair question, and the answer is more interesting than you’d expect.
VRAM on a Mini PC works differently from what you’d find on a dedicated graphics card. The number in Task Manager isn’t the whole picture, and in many cases, you can adjust your VRAM allocation yourself, without any third-party tools. This guide covers how Mini PC VRAM actually works, how much you realistically need for different workloads, and how to adjust it on AMD platforms if your use case calls for it.
What Is VRAM on a Mini PC?
Before getting into how Mini PCs handle graphics memory, it helps to define VRAM itself. VRAM (Video Random Access Memory) is the memory a graphics processor uses to store data it needs to access quickly—textures, frame buffers, shader data, geometry, and increasingly, AI inference tensors and compute data for workloads like local language models.
There are three related concepts worth separating clearly, since they’re often used interchangeably even though they describe different things.
Dedicated VRAM
On a traditional desktop with a discrete GPU, VRAM is straightforward: it’s a pool of dedicated high-speed memory soldered directly onto the graphics card. Your RTX 4070 has 12GB of GDDR6X. That memory belongs entirely to the GPU, operates at extremely high bandwidth, and doesn’t share space with anything else. The capacity is fixed at the factory and never changes.
Shared Graphics Memory
Mini PCs work differently. Most use an integrated GPU (iGPU) built directly into the processor instead of a separate graphics card. The iGPU doesn’t have its own dedicated memory chips. Instead, it borrows a portion of system RAM whenever a graphics workload needs it and gives that memory back once the workload ends. This is why the graphics memory available on a Mini PC isn’t a fixed number. It shifts based on what’s currently running.
Unified Memory Architecture (UMA)
The specific architecture that makes this sharing possible is called UMA—Unified Memory Architecture. In a UMA design, the CPU and GPU draw from one shared memory pool rather than each having a separate dedicated pool, and resources are assigned dynamically according to workload demand. AMD Ryzen AI platforms, including the ones used in the VTA-439 and M5, are a common example of this design.
Some BIOS implementations also let users reserve a larger portion of memory for graphics ahead of time. As we’ll cover in Section 3, this doesn’t create new VRAM. It simply changes how much system memory is set aside in advance, before Windows even loads.
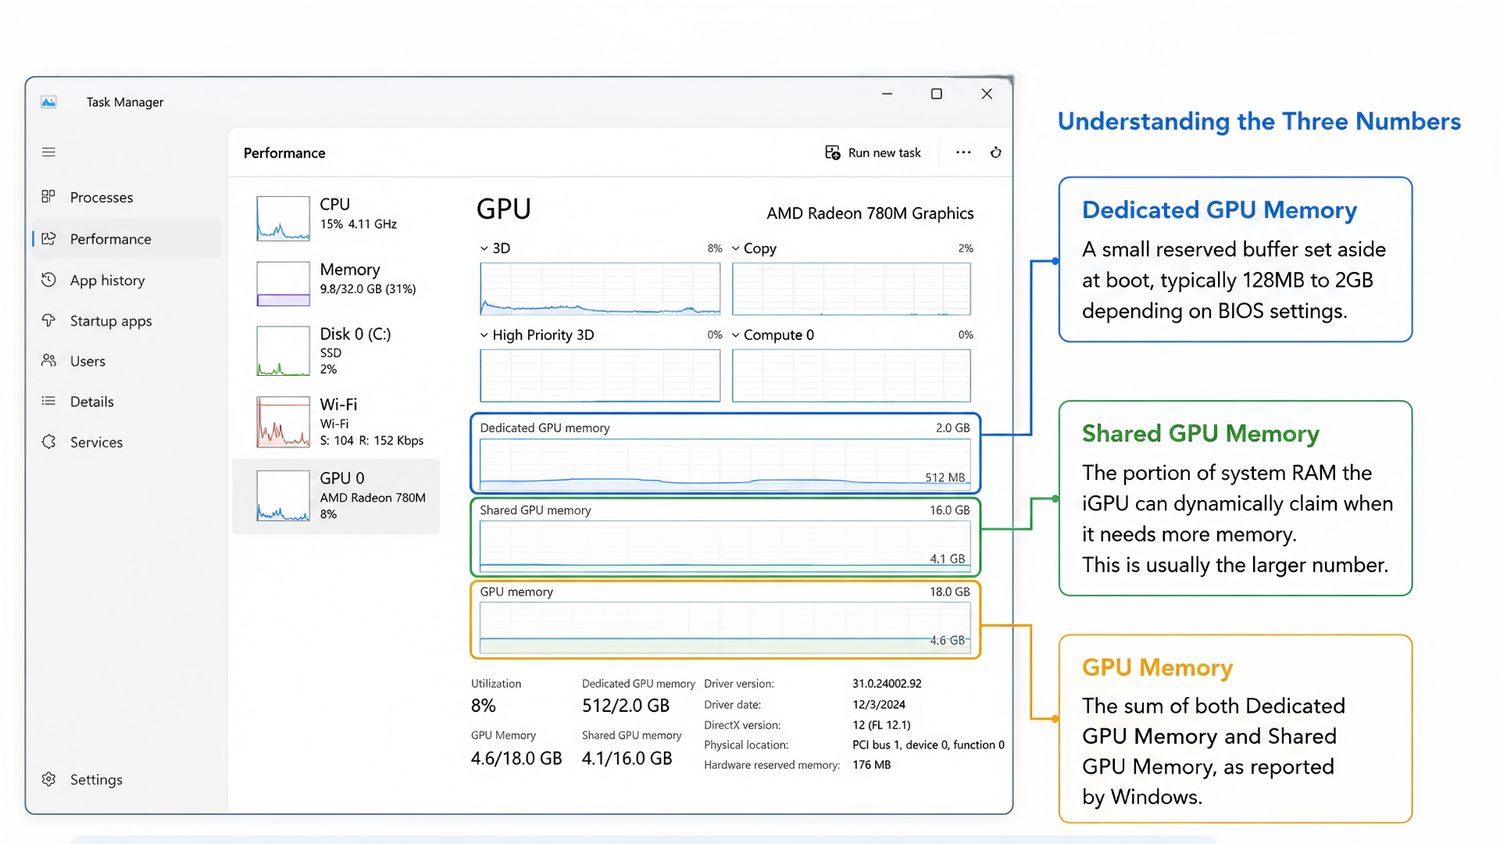
What you see in Windows Task Manager
When you open Task Manager → Performance → GPU, you’ll see three numbers:
- Dedicated GPU Memory: A small reserved buffer set aside at boot, typically 128MB to 2GB depending on BIOS settings.
- Shared GPU Memory: The portion of system RAM the iGPU can dynamically claim when it needs more memory. This is usually the larger number.
- GPU Memory: The sum of both, as reported by Windows.
Important caveat: These values are reported by the Windows Display Driver Model (WDDM) and do not directly reflect the total GPU-accessible memory at any given moment. How much memory a game or application can actually use depends on the driver, system load, and graphics API in use. Task Manager gives you a useful reference point, not an exact guarantee.
The practical takeaway: Don’t anchor on the Dedicated number alone. On a Mini PC, Shared GPU Memory is where the real headroom lives, but actual availability will vary with system conditions.
How Much VRAM Does a Mini PC Actually Have?
Because iGPU memory comes from your system RAM, the usable amount isn’t fixed. It shifts dynamically based on total memory capacity, what the OS and applications are currently using, and how the system allocates resources at any given moment.
As a general principle: more system RAM means more potential headroom for the iGPU. A system with 32GB has a smaller shared memory pool to draw from than one with 64GB or 128GB. The actual amount available at any time will vary with system load and configuration. The numbers you see in Task Manager are reported values, not guaranteed allocations.
What this means practically: if you’re doing GPU-intensive work on a Mini PC, total system memory capacity is one of the most important specs to evaluate because it sets the upper boundary for how much shared graphics memory can ever be available.
Memory bandwidth matters more than most people expect
A common mistake is treating VRAM allocation as the only variable that matters. For iGPUs, memory bandwidth is equally important, because it determines how fast the GPU can actually move data in and out of that shared pool.
This is why dual-channel memory configuration and higher memory speeds (LPDDR5X vs LPDDR4X, for example) can have a larger real-world impact on iGPU performance than simply allocating more VRAM. More memory at lower bandwidth often underperforms less memory at higher bandwidth.
The practical implication: when evaluating a Mini PC for GPU-dependent workloads, check the memory speed and channel configuration alongside total capacity.
GPU architecture and CPU performance also play a role
Memory bandwidth isn’t the only variable beyond raw VRAM allocation. The generation of integrated GPU architecture matters too. Newer iGPU designs deliver meaningfully better performance than older generations, independent of how much memory is allocated to them. CPU performance is a factor that’s easy to overlook as well: integrated graphics share thermal and power budgets with the processor, so CPU efficiency directly affects how much headroom the GPU has to work with under sustained load.
None of this means VRAM allocation doesn’t matter. Actually it means that VRAM is one input among several, not the single lever that determines overall performance.
Can You Adjust VRAM on a Mini PC?
Yes, and Here’s How.
Before walking through the steps, it’s worth being clear about what this adjustment actually changes. BIOS options labeled “VRAM,” “UMA Frame Buffer,” or “Graphics Memory” don’t increase the GPU’s underlying hardware capability; no new memory is being added. What they do is reserve a larger share of existing system RAM for graphics use before Windows even loads, which changes how much is immediately available to the GPU without the driver having to request it dynamically later.
With that framing in mind: on AMD platforms, this BIOS-level adjustment is a standard, supported option. Intel platforms handle this differently depending on the specific hardware and firmware implementation—we’ll cover both below.
One important note before diving in: adjusting VRAM allocation isn’t something most users ever need to do. Default settings handle everyday tasks, gaming, and most content creation workflows without any manual intervention. The steps below are for users with specific workloads, particularly local AI inference, where controlling GPU memory allocation has meaningful impact.
AMD Platform—BIOS-Level Adjustment
AMD systems expose a UMA Frame Buffer setting in BIOS, sometimes referred to as Variable Graphics Memory (VGM), though terminology may vary by platform and BIOS implementation. This setting lets users manually reserve a portion of system memory for the iGPU at boot time.
On the BOSGAME VTA-439 (AMD Ryzen AI 9 HX 470), here’s the process. Note that the BIOS interface and available options may vary slightly depending on the firmware version.
- Boot the system and press Alt + F5 to trigger debug mode, then press F4 to save and let the system reboot. (This first reboot unlocks the full AMD CBS menu. Without it, some advanced options—including VRAM settings—won’t appear.)
- Press Delete to re-enter BIOS. Navigate to Advanced (wrench icon) and select AMD CBS.
- Go to NBIO Common Options → GFX Configuration.
- Select Dedicated Graphics Memory and adjust your UMA FB size to your preferred allocation.
- Press F4 to save and reset.
Once the system restarts, open Task Manager to check whether the Dedicated GPU Memory value has updated. Keep in mind that the reported value is a WDDM-reported figure—actual GPU-accessible memory may differ depending on system load and driver behavior.
AMD Platform—BIOS-Level Adjustment
On the BOSGAME M5 (AMD Ryzen AI Max+ 395), the process is slightly different; no debug-mode reboot is required. As with any BIOS adjustment, interface details may vary slightly by firmware version.
- Power on the system and press Delete to enter BIOS.
- Navigate to Advanced and select GFX Configuration.
- Select iGPU Configuration, press Enter, and choose UMA_SPECIFIED. (Switching to UMA_SPECIFIED unlocks the frame buffer size option in the next step. It won’t appear if the setting remains on Auto.)
- Select UMA Frame Buffer Size and choose your target allocation based on your workload.
- Press F4 to save and exit.
- Once Windows loads, open Task Manager → Performance → GPU to check whether the shared memory allocation has updated.
The M5’s 128GB unified memory pool means that a significant portion of system memory can be allocated as shared graphics memory. This model is well-suited for memory-intensive workloads like running large local AI models that require substantial GPU memory to load efficiently.
Intel Platform
Intel’s approach to iGPU memory management differs from AMD’s and varies more significantly by OEM implementation. Some Intel Core Ultra platforms may expose shared GPU memory controls through Intel Graphics Software, depending on the specific device configuration, firmware, and driver version in use.
For the BOSGAME VTI-490 specifically, manual VRAM allocation adjustment is not currently available as a user-facing option. If this changes with future firmware or driver updates, we’ll update this guide accordingly.
If you’re on a different Intel Core Ultra device and want to explore whether your platform supports memory override controls, checking the Intel Graphics Software under System settings would be the recommended starting point after ensuring your driver is fully up to date.
A note on limits (all platforms)
Adjusting VRAM allocation isn’t a free upgrade. Every GB you assign to the GPU is a GB your CPU, OS, and applications can no longer use. Over-allocating can cause system slowdowns, application crashes, or instability, especially on systems with 32GB or less. Start conservative, test your specific workload, and only increase if you’re hitting a genuine memory ceiling.
How Much VRAM Do You Actually Need?
The honest answer: for most everyday use, the default allocation is fine. Manual adjustment is a tool for specific situations, not a general performance booster.
Here’s a practical breakdown by workload:
Everyday Productivity and Media
Web browsing, documents, video playback, and video calls—the iGPU handles all of this comfortably within default allocations. No adjustment needed.
1080p Casual Gaming (Competitive titles, Indie games)
Games like Valorant, CS2, Stardew Valley, or Hades are relatively light on VRAM. On a system with sufficient RAM, default allocation is sufficient for smooth 1080p performance. Focus on in-game settings (resolution scale, texture quality) before touching VRAM.
AAA Titles and 1440p Gaming
This is where VRAM headroom starts to matter. Modern AAA games at high texture settings can push past 8GB easily. On a Mini PC, the practical lever here is total system memory. More RAM means more headroom for the iGPU to draw from when the game demands it. Lowering texture quality from Ultra to High often recovers meaningful VRAM with minimal visual difference and is usually more effective than adjusting VRAM allocation directly.
Content Creation (Video Editing, 3D Rendering)
Applications like DaVinci Resolve, Blender, and Adobe Premiere can be GPU memory-intensive, especially with high-resolution timelines or complex scenes. A system with ample RAM provides more shared memory for the GPU to work with. Memory bandwidth matters significantly here, alongside total capacity.
Local AI and LLM Inference
This is where VRAM allocation has the most meaningful impact. When a model’s weights fit entirely within GPU-accessible memory, inference speed can increase substantially compared to CPU-based or disk-offloaded inference. For users running models like Llama 3, Mistral, or Qwen locally, the most important configuration decision is maximizing GPU memory allocation and choosing hardware with a large enough memory pool to begin with.
Common Mistakes to Avoid
“Mini PCs can’t adjust VRAM."
False.
On AMD platforms, BIOS-level VRAM allocation adjustment is a supported feature on current-generation hardware. Intel platforms vary by device and implementation. If you’ve seen a review or forum post claiming adjustment is impossible across the board, it’s likely referring to older hardware, a specific platform limitation, or an outdated driver version.
“More allocated VRAM always means better performance."
False.
Allocating more memory to the GPU reduces what’s available to the rest of the system. On a system with limited RAM, pushing too much to the iGPU leaves less for Windows, your browser, background apps, and everything else. If system memory runs short, the OS starts paging to disk, and overall performance can drop more than it gained from the extra GPU allocation.
“The Dedicated GPU Memory number in Task Manager is my total VRAM."
False.
On a Mini PC, Dedicated GPU Memory is just the pre-reserved buffer, often a small fraction of what’s actually available. The real picture includes Shared GPU Memory. Both numbers are WDDM-reported values and reflect system-level reporting, not a precise measure of what any specific application can access at runtime.
“Changing the DedicatedSegmentSize registry key increases real VRAM."
False.
This registry tweak—which circulates widely online—changes only what Windows displays as dedicated GPU memory. Games and applications query actual hardware memory directly through DirectX APIs, bypassing the registry value entirely. It has no functional effect on performance or real memory availability.
“Shared graphics memory is always slower than dedicated VRAM."
False.
This was truer in the DDR4 era, when shared memory bandwidth lagged well behind dedicated GDDR memory. Current-generation LPDDR5X and DDR5 platforms close much of that gap, and combined with newer iGPU architectures, integrated graphics on a well-configured Mini PC can handle workloads that would have been impractical just a few years ago. Shared memory still has real bandwidth limitations compared to dedicated VRAM, but “always slow” overstates the current reality.
Frequently Asked Questions
Q1: Does adjusting the UMA Frame Buffer affect system stability or void any warranty?
Adjusting UMA Frame Buffer size is a standard BIOS setting, not a modification that voids hardware warranties. It’s a supported configuration option, not a workaround. That said, allocating too much memory to the GPU can cause instability if it leaves too little for Windows and your applications. If you experience slowdowns or crashes after changing this setting, the safest fix is reverting it to the default value.
Q2: Will the VRAM number in Task Manager change after every restart?
The Dedicated GPU Memory value is set at boot time based on your current BIOS configuration, so it stays consistent across restarts unless you change the BIOS setting itself. The Shared GPU Memory and total GPU Memory values, however, can vary while the system is running, since they reflect what’s dynamically allocated to active workloads at that moment.
Q3: Is 16GB of RAM enough for a Mini PC?
For office work, web browsing, and media playback, 16GB is generally sufficient. For gaming, content creation, or any local AI workload, more headroom makes a meaningful difference, since that same memory pool has to cover the OS, your applications, and the iGPU’s shared allocation simultaneously. If your use case includes any of those heavier workloads, starting with more RAM avoids hitting a ceiling later.
Q4: Does OCuLink eGPU support replace the need to adjust VRAM?
For workloads that exceed what an iGPU’s shared memory can handle, an OCuLink-connected external GPU sidesteps the limitation entirely by adding a discrete graphics card with its own dedicated VRAM. The VTA-439’s OCuLink port supports this kind of expansion, though it requires purchasing a separate eGPU enclosure and graphics card. It’s a hardware upgrade path, not a software or BIOS setting.
Q5: Can I revert to default VRAM settings after changing them?
Yes. The UMA Frame Buffer setting in BIOS can be changed back to its original value (often labeled “Auto”) at any time, following the same steps used to adjust it. There’s no permanent change to the hardware. You’re only changing a reserved memory value that takes effect at the next boot.
Final Takeaway
Mini PC VRAM isn’t a fixed spec. Instead, it’s a pool drawn from system memory, shaped by your hardware configuration and adjustable within supported limits.
For most users, the default allocation handles everyday tasks without any manual intervention. Where adjustment becomes meaningful is at the edges: large local AI models that need maximum GPU memory to load efficiently, content creation pipelines that benefit from a larger GPU buffer, or gaming sessions where texture memory starts to create pressure.
The clearest guidance: choose a Mini PC with enough total system memory for your ceiling use case, not just your average one. The VRAM allocation can be tuned later. The memory ceiling can’t.

Leave a comment
All comments are moderated before being published.
This site is protected by hCaptcha and the hCaptcha Privacy Policy and Terms of Service apply.